Getting Started
To get started, you'll first need to obtain a copy of the project by cloning the Git repo, or another method, if you haven't already done so. Then setup your build environment, and finally build the libraries, examples, tools and unit tests.
Cloning The Project With Git
Clone the project to a location in your filesystem, and update the submodules. For example, to clone the project in your home directory:
macOS/Linux
$ git clone https://github.com/Fitbit/golden-gate ~/golden-gate
$ cd ~/golden-gate
$ git submodule update --init --recursive
Setting Up Your Build Environment
Prerequisites
macOS
macOS is the recommended platform for working with Golden Gate, as it offers the most complete build environment, including the ability to build all targets, run all the examples, and can use the native Bluetooth support.
On a mac running macOS 10.14 (Mojave) or higher, you will need to have at a minimum:
- XCode 11 or higher, including the command-line tools
- Homebrew - see Homebrew for installation instructions
- Miniconda (or Conda) - see Conda for macOS installation instructions
With those prerequisites installed, you can initialize an environment for the Golden Gate project. In a shell window, from the top-level directory of the project, first install the homebrew packages by running
$ brew bundle
Then continue with the instructions for setting up a conda environment, below
Linux
A Linux host can be used to build all the targets, except iOS. On a Linux machine, you will need to have at a minimum:
- Git
- GCC and G++ (
build_essentialpackage on Ubuntu or similar) - Miniconda (or Conda) - see Conda for Linux installation instructions
Docker
If you have docker installed on your system, the
project includes a Dockerfile that you can use to build a docker image.
The resulting docker image contains the minimal set of tools needed to build the
core libraries, examples, tests and docs.
The easiest way to build the docker image is to use the invoke task (if you
have installed invoke on your host system):
$ inv docker.build
Dockerfile as
input.
Windows
Under construction
While the core library does compile and run on Windows, support for that platform is currently being re-factored. It isn't functional yet in the current release of the project.
Setting Up a Conda Environment
Now that you have conda, you can create a Conda environment.
Conda is an open source package management system and environment management system that runs on Windows, macOS and Linux. Conda quickly installs, runs and updates packages and their dependencies.
This project uses Conda to manage the installation and update of a number of tools and software components that are necessary for building and running the software.
Create your conda environment by running
$ conda env create -n gg
conda environment named gg.
Using a different environment name
You can choose a different name for your environment if you wish.
We use the name gg by default, but you can specify any other name you want
when creating the environment by passing that name with the -n option of
the conda env create command
Once your environment is created (which you only need to do once), you can activate it by running
$ conda activate gg
Activate your gg environment anytime you want to work with the project.
Once the environment is activated in a shell, all the tools that are needed to
build and run the code are in your PATH.
Updating you environment
If you pull updated versions of the project, you should also update your gg
environment (you don't need to re-create it every time) by running
$ conda env update -n gg
Smoke-testing your environment
An easy way to do a basic test to check if your initial environment setup has worked, and has been activated, is to try a simple command like:
$ inv -l
invoke
task execution system, which you will use later to execute a number of
tasks like building and running.
Building
The project uses the invoke task execution
system to automate a number of tasks, including building the libraries and
documentation, building and running tests, and more.
Building For Your Host System
Building for your host system is called a 'native' build.
CMake is used to generate Makefiles and/or Ninja files (if the Ninja build
system is installed on your system, which should be the case if you have
correctly setup and activated your conda environment).
Your host system could be a mac running macOS, a machine running Linux, or a
virtual environment running in docker (use inv docker.run for an easy way
to start a shell in a docker container, or use a custom invocation of docker
with the docker image for the project, built as explained above).
Run
$ inv native.build
xp/build/cmake/native.
For example, you should be able to run
$ xp/build/cmake/native/apps/stack-tool/gg-stack-tool
gg-stack-tool command-line tool.
And run
$ inv native.test
Using XCode on macOS
If your host system is a mac, it is usually convenient to be able to build, run and debug from within XCode, rather than on the command line. This is the recommended way to work interactively with the project on a mac when you want to edit/compile/run/debug.
There are two options available
Generating An XCode Project Using CMake
First, ensure that you have the XCode command line developer tools installed. If you're not sure, run:
xcode-select --install
xcode-select: note: install requested for command line developer tools
Then generate the XCode project by running
$ inv apple.macos.xp.gen
xp/build/cmake/xcode-macOS/golden-gate-macos.xcodeproj.
When you open that project file, you will find build targets for all the libraries,
the command-line tools, the examples, and the unit tests. You can build, run and
debug right from within XCode.
Tip
If you get a CMake error saying No CMAKE_C_COMPILER could be found, try
$ sudo xcode-select --reset
$ sudo xcode-select -s /Applications/<Xcode-version>.app>/Contents/Developer
Using The Pre-generated XCode Project
A hand-made XCode project is used to build the framework as well as the so-called "Host Application", which is a sample application that illustrates how to use some of the basic functionality offered by the framework. See the Building For iOS paragraph below for details, as the same project may be used for macOS as well as iOS.
Building For Android
See the Android Platform documentation for instructions on how to build the libraries, bindings and sample app for Android.
Building For iOS
See the iOS Platform documentation for instructions on how to build the libraries, bindings and sample app for iOS.
Building For The Pylon Embedded Platform
Pylon is the name used for the project's reference RTOS port. In the current version, the Pylon port is a MyNewt application running on a Nordic nRF52840 DK Development Kit.
See the MyNewt Platform documentation for instructions on how to build the libraries, bindings and sample app for MyNewt.
Building For The Espressif ESP32 Platform
A basic port and sample Bluetooth peripheral application that can run on ESP32 processors is included.
See the ESP32 Platform documentation for instructions on how to build the libraries and sample app for ESP32.
Building For Other Platforms
See the Platforms documentation for more details.
Running Examples
Depending on your host system, and what targets you have chosen to build, there are different ways to start running some of the examples.
You can find a few typical example configurations below, but this is by no
means exhaustive. Once you become familiar with the different targets and
example apps, you can come up with many more ways to setup pairs of communicating
endpoints.
Also, you can start building your own applications and devices, then many more
options are available to you.
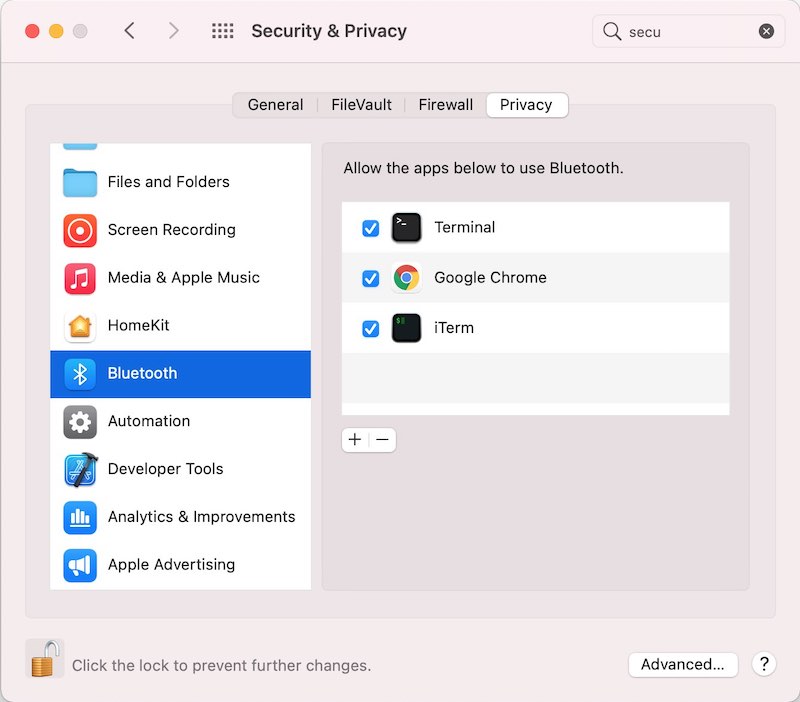
Bluetooth Permissions on macOS
On macOS Big Sur and later, applications that use Bluetooth need to be
granted permissions to do so. When running the gg-stack-tool command line application,
if your terminal is permissions-aware, like the macOS built-in terminal app, the system
should prompt you the first time you run gg-stack-tool. For other terminals, like iTerm
for instance, you may need to grant the permission manually, using the system preferences:
System Preferences -> Security & Privacy -> (Privacy Tab) -> (BlueTooth selection on the left),
add/enable your terminal application.
Host Only
This is the simplest way to start running two instances of a Golden Gate stack
on a single Mac or Linux host, without any dependency on a "real" transport like
Bluetooth: you simply run two command line applications, each in its own
shell on your host machine; the two applications communicate with each other
using a local socket.
See the Stack Tool documentation for some examples.
macOS <-> Device
If you have a Nordic nrf52840-DK Development Kit, you can build the Pylon
gg-peripheral app and connect to it from your mac over Bluetooth.
See Mynewt Apps for details on how to run and
configure the gg-peripheral app on your board.
Mobile <-> macOS
If you have an iOS or Android phone, and want to try out one of the mobile
Host Apps (iOS Host App and
Android Host App) and a mac,
you can run an instance of the Stack Tool on the mac,
as a Peripheral (a.k.a Node in Golden Gate terminology), and use the Host App on
your phone to connect to it.
In addition you will run a CoAP server on your mac, that the Host App will
make requests to, communicating through the stack tool.
In a first Terminal window, run the CoAP server:
$ gg-coap-server
In a second Terminal window, run the stack tool in Node mode, configured to act
as a Bluetooth peripheral, advertising under the name Jiji (the default name
used by the stack tool), and forwarding CoAP requests to port 5683 on localhost.
$ gg-stack-tool --top coap 127.0.0.1 5683 5684 --bottom bluetooth node node DSNG
Now, from either the iOS Host App or Android Host App, scan and find the mac
that is advertising as Jiji, connect, and once the connection is established,
send a CoAP request to /helloworld
Mobile <-> Device
If you have an iOS or Android phone, and want to try out one of the mobile
Host Apps (iOS Host App and
Android Host App), and a Nordic nrf52840-DK
Development Kit, you can run the gg-peripheral app on your board and
connect to it from your mobile app.
Device <-> Device
If you have a two Nordic nrf52840-DK Development Kits, you can build both the
Pylon gg-central and gg-peripheral apps and connect one to the other.
See Mynewt Apps for details on how to run and
configure the gg-central and gg-peripheral apps on your board.
What's Next?
Start exploring the project, its architecture, components and APIs, and see how you can use the framework in your own applications and devices.